Transaction Monitoring
Learn how to set up Transaction monitoring.
When a user registers for a new account or puts something in their shopping cart and checks out, those kinds of transactions involve several steps. With Interaction Monitoirng, a.k.a Transaction Monitoring, you can automatically test how multiple steps and scripts work together, making sure you produce the final output you want.
To get the most out of our Transaction Monitor, you’ll need to have basic skills in coding. In this example, we’ll set up a transaction check that covers a customer journey. The check goes to threadless.com online store, searches for a T-shirt named “ghost busted”, selects size L and adds that to the cart and verifies that the right item ends up in the checkout processes, ready to be purchased. Let’s get started.
Go go to Monitoring, followed by Transaction.
Click Add new.
Name your check.
Our Transaction Monitoring reproduces all the steps at set time intervals. Set the test interval of your choosing. The default setting is ten minutes. If something fails in a transaction, you can receive an alert but we’ll get back to this later on.
Choose where you want your test to be performed from.
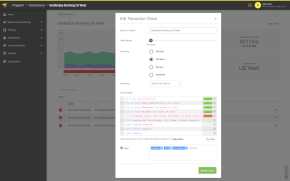
Now click the Check editor. Here’s where you define the step-by-step process.
Double click “Go to URL” that now appears at the top of the list of commands. You can double click commands or type manually.
Type threadless.com
When you hit enter, a list of Commands and Validations appears in a drop down menu. A command tells a check to do something. A validation tells the check to make sure something exists on the page or that something is in a particular state.
All lines are clickable.
Our first step is the search field. We want to make sure the elements loads properly. To do that we click “wait for element” and then type search. The TMS editor shows us relevant options as we type. There it is, click “search form”
Everytime you hit Enter, you add a new step to the process and the response time for the previous step is calculated. Any errors will show here. When the response time is green, things are working fine.
Now that we know that the “search form” is loaded we need to type our search in there. Click “fill in field” followed by search, then in the text field, type, “ghost busted”. Hit Enter.
Next step is to find the “search result” ID. The check editor will try to fetch all the existing elements on the site, if you don’t find what you are looking for you need to obtain the correct element ID manually. To find it we will use the “inspect element” tool on the site and then use “copy selector” to acquire the correct ID of that specific element.
Back in the “Check editor” we use the command “click” and then paste the information from the “copy selector” and hit “enter”.
Our next step is to make sure the element for size L is loaded. We do that with the same technique.
Choose the command “wait for element” to exist.
At the site we use “Inspect element” and “copy selector”.
Paste the “element” information into the “check editor” and hit enter.
Our next command is “click” and here we paste the same information as above.
Now we will do the same thing for “Add to cart” and “view cart”. For the purpose of this video we will fast forward through these two steps.
Now we want to validate that the cart has the right quantity. First we acquire the element selector for the field then in the “check editor”, Scroll down to “validations” click “text field should contain”, paste the information and type 1. Hit Enter.
Next step is the “checkout button”. This step we’ll do the same way as we did with “Add to cart” and “view cart”. Click “command”, “Wait for element to exist”, “Inspect element”, “copy selector”, “paste”, “command”, “Click”, and “paste”, again.
The last step is to check that the “cart summary” loads. Click “wait for element” and type cart, there it is.
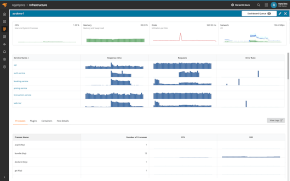
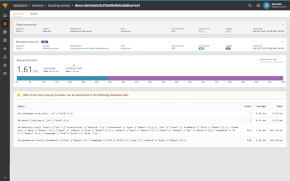
To make sure everything is working properly, Click “Run test”. When every step is marked green, you can be assured that this transaction is functioning. And you also get insight into the load time of each step.
If you have many Checks running, adding tags will make it easier to find them.
Here you can set up an alert for this particular string of actions. Depending on your account type the number of users varies but if you are the only one then your name automatically will show up here.
If you have set up any integrations you’ll find them here.
Click Create Check and your Transaction check will appear in the list of ongoing Transaction checks.
When the check is saved it will show in grey, in a few minutes this icon will turn green indicating everything is running smoothly.
If you modify an existing check a revision box appears where you can choose which version to use.
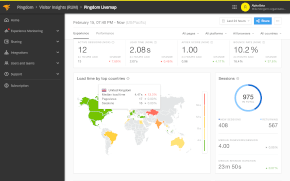
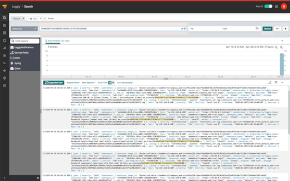
In the reports section you can see how your check is performing.
You can use this feature for many useful things. Try it out and have fun.
Try it free for 30 days
Start monitoring your website's availability
START 30-DAY FREE TRIALGet started now and you can cancel any time.